Workshop Tips: Creating Guided Tours
3D Showcase 2.0 came with an exciting new feature: Guided Tours. With Guided Tours, you can take more control over the experience you provide your audience, directing them to points of interest and offering a sit-back exploration mode.
Guided Tours come with two modes - Slideshow Mode offers fade in/out transitions that are similar to a traditional “virtual tour,” while Walkthrough Mode offers a dynamic journey through a Space, taking full advantage of the underlying 3D Mesh.
In this post, we’re offering 5 tips for how to create dynamic, immersive experiences using Walkthrough Guided Tours.
1. Plan your path
Before you start collecting Snapshots for your Highlight Reel, look at your Space in Floor Plan View, noting the scan positions, points of interest, and possible paths. You may even want to print out the Floor Plan View of each floor in order to plan transitions between scan positions.
Planning your path beforehand will help you decide which Highlights to create, and from which angles. It will also help you plan a path so that Highlights are evenly spaced for the most natural transition experience.
2. Avoid sharp turns and path “hooks”
Below is a picture of a “hook,” a path that leads around a tight corner then stops. When there are sharp turns in your path, it can cause abrupt twists in the tour that can be jarring.
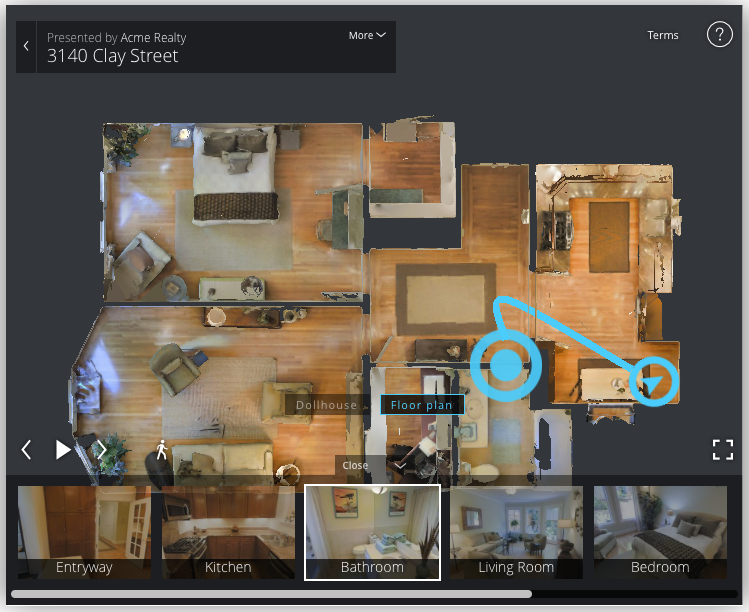
To understand the paths you’re creating, you can switch to Dollhouse or Floor Plan Views and mouse over the Highlight Reel destinations. This will reveal the path that the tour will take through your Space, and will help you make adjustments.
3. Navigate around furniture, not over it
Try to choose locations that have unobstructed floor paths between them. If there is furniture between two points, Guided Tour will walk over or through tables, chairs, or countertops, creating an awkward experience.
4. Limit transition span
Don’t create transitions that span the length of an entire property. Instead, create a path with even transition lengths from one scan point to another. A good rule of thumb is that positions in sequence should be visible to each other, or be in neighboring rooms.
5. Refine your Highlights
As you create your transitions, you may find that some Highlight positions don’t create an optimal experience. Once you’ve created your transitions, be willing to collect new Highlights from different angles to improve the transition experience.
Bonus Tip: Controlling Turn Direction
While a Guided Tour is playing, you will notice a gentle pan when viewing each Highlight. The direction of this pan is determined by the preceding transition, and follows the same viewport movement. For example, if the viewport turns to the right when moving from Highlight A to Highlight B, the pan will continue moving to the right.
You can use this to create continuity (or a deliberate change in pan direction) between Highlights.
Or, if you would prefer to turn panning off completely, you can add kb=0 to the 3D Showcase URL. As an example: http://my.matterport.com/show/?m=xxxxxxxxxx&kb=0.